Section 8
Container Configuration Utility Screen
This section describes the features available on the Container Configuration Utility screen. DataLINE provides an interface to create and store new configurations in the PC through the Container Configuration Utility. The utility also provides the capability to copy and delete container configurations between DataReader and the PC.
8.2Container Configuration Utility
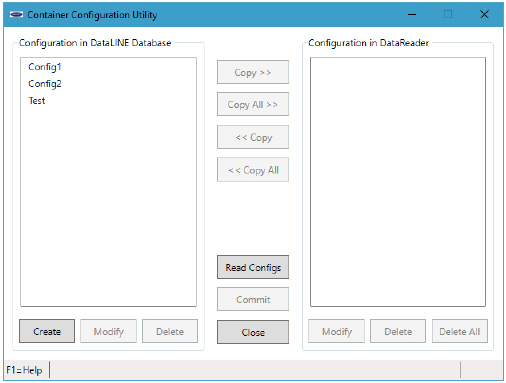
The Container Configuration Utility screen (Figure 8.1) is displayed when the user clicks on the DataReader DataSet button in the DataReader Group Box on the Launch Pad.
Figure 8.1 Container Configuration Utility Screen
Procedure to Connect to the DataReader:
1.Connect the DataReader to the PC using Upload Cable P/N 22-01743-00.
2.Turn the DataReader “ON”, and use the down arrow to scroll to “Transfer Data”.
3.Press the “Enter” button on the DataReader.
4.In the “Container Configuration Utility” screen, click on the “Read Config” button to connect to the DataReader. The status of the connection can be determined as follows:
If the connection to the DataReader is successful, the configurations are displayed in the list box in the “Configurations in DataReader” Group Box.
If the connection to the DataReader is not successful, the user is notified with a message to check the connections between the PC and DataReader or check that the DataReader is in transfer mode.
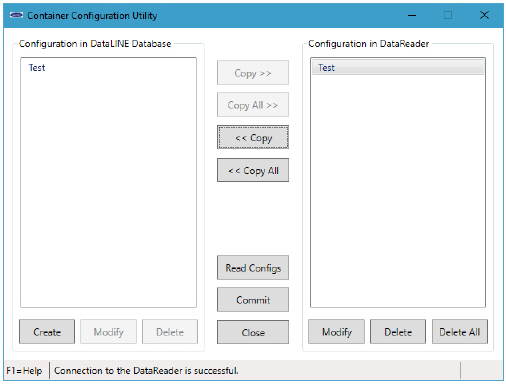
The DataReader Connection screen (Figure 8.2) is displayed upon successful connection with the DataReader.
Figure 8.2 DataReader Connection
Copy Configurations from the PC to the DataReader:
1.Select one or more configurations from the list box by highlighting the name of configuration in the “Configurations in PC Database” Group Box.
2.Click on the “Copy >>” button.
Copy Configurations from the DataReader to the PC:
1.Select one or more configurations from the list box by highlighting the name of configuration in the “Configurations in DataReader” Group Box.
2.Click on the “<< Copy” button.
Copy all Configurations from the PC to the DataReader:
1.Click on the “Copy All >>” button.
Copy all Configurations from the DataReader to PC:
1.Click on the “<< Copy All” button.
Delete Configurations from the PC or the DataReader:
1.Select one or more configurations from the list box by highlighting the name of the configuration.
2.Click on the “Delete” button in the corresponding Group Box.
3.To delete all configurations in the DataReader, click on the “Delete All” button in the “Configurations in DataReader” Group Box.
Save Changes to the PC Database and the DataReader:
1.Click on the “Commit” button.
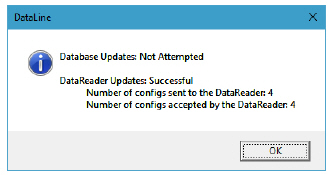
2.After the commit process completes successfully, the following details are displayed:
•Database Updates - Status of the database updates as Success or Failure or Not Attempted.
•DataReader Updates - Status of the DataReader updates as Success or Failure or Not Attempted.
•Number of Configs Sent - Number of list box configurations in the “Configurations in DataReader” Group Box.
•Number of Configs Accepted - Number of configurations successfully sent to the DataReader.
The Commit Process Completed screen is displayed (Figure 8.3) upon completion of the commit process.
Figure 8.3 Commit Process Completed
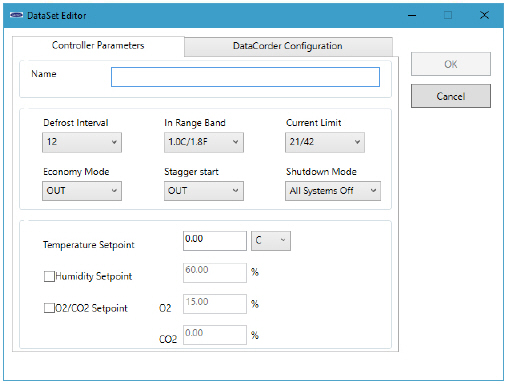
This section describes the features available on the DataSet Editor screen. DataLINE provides an interface to create configurations in the PC database through the DataSet Editor screen. The utility also provides the capability to modify container configurations stored in the DataReader and the PC.
Create a New Configuration in the PC Database:
1.Click on the “Create” button in the “Configurations in PC Database” Group Box.
For a new configuration, all the values in the fields are set to the default settings. The user has the ability to change these default values.
Modify an Existing Configuration:
1.Select the configuration from the list box in either the PC Database or the DataReader.
2.Click on the “Modify” button. The configuration name is displayed in the “Name” field.
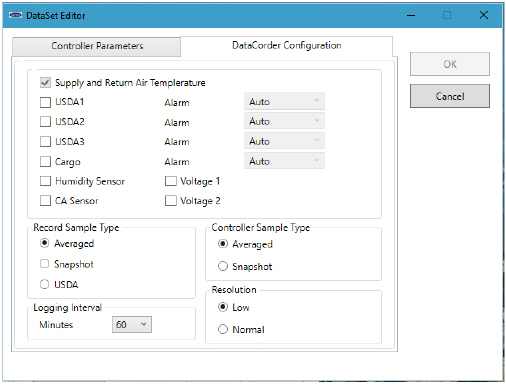
The DataSet Editor screen (Figure 8.4) is displayed when the user clicks on the “Create” or “Modify” button. Two tabs are displayed when the screen opens: one for Controller Parameters and one for DataCorder Configuration. Click the “Cancel” button to cancel the create/modify operation.
To change DataCorder Configuration values click on the “DataCorder Configuration” tab on the DataSet Editor screen. The DataSet Editor screen (Figure 8.5) for DataCorder Configuration is displayed.
Figure 8.5 DataCorder Configuration Screen