
Section 2
The user should access the DataLINE Help utility that is included with the DataLINE application to obtain a more in-depth understanding of the DataLINE application and its features. The Help utility provides the user with detailed directions for using the DataLINE application
The DataLINE application provides capabilities for the following hardware platforms:
1.MicroLink 2i (ML2i) based integrated Controller / DataCorder units.
2.MicroLink 3 (ML3) based integrated Controller / DataCorder units.
Data from a Microlink (ML1) unit must be retrieved using the Carrier DataReader* hand held device. DataLINE can then be used to transfer data from the DataReader* to a PC.
Connections to MicroLink 3 (ML3) Controller / DataCorders and reports generated from MicroLink 3 downloads will be identified as MicroLink 2i by the DataLINE application.
Data retrieval can be accomplished with one of the following devices:
1.Stand-alone, windows-based portable personal computer (PC) with the appropriate cable and DataLINE application.
2.Carrier DataBANK card. Data can be transferred to a personal computer using the Omnidrive interface for reading by DataLINE.
3.Carrier DataReader* hand held retriever. The data can be transferred from the DataReader to a PC.
All data retrieved from a DataCorder is automatically converted to a DCX file, which is a Carrier Transicold proprietary file format.
As new versions of the DataLINE software are released, updates to the software will be available on the Carrier Transicold web site. These updates are called a “Service Pack”. In order to protect software ownership, a Service Pack can only be loaded onto a PC that already has DataLINE software installed.
* The legacy DataReader device is still supported through DataLINE but no longer available for purchase.
2.2Installation & Start Up Procedures
The following procedure is a full installation of DataLINE onto a Windows 7/8/10 computer.
DataLINE requires Microsoft .NET framework 4.5. If this is not installed on your computer, it will be installed during the DataLINE install.
Preparing to Install:
1.Administrator privileges may be required in order to install DataLINE on your device. If you don't have these system privileges or the installation will not run please contact your local system administrator who can assist with system privileges.
2.Make sure all programs are shut down before starting the upgrade process. This includes programs that may be running in the background in the Windows toolbar, such as software firewalls, Anti-virus programs, Instant messaging programs etc.
Procedure for All Users:
1.If DataLine is supplied to you as a zipped file, unzip to a temporary directory. The Dataline_setup.exe file cannot be run directly from inside the zip file.
2.Double click on the “DataLINE_Setup.exe” file. The application installation screen is automatically launched.
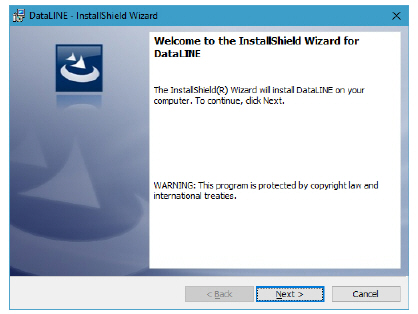
3.The Welcome screen is displayed to begin the setup process. Click “Next” to bring up the License screen.
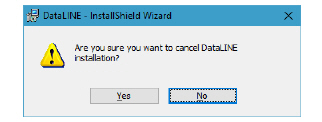
If “Cancel” is clicked, a screen appears asking to cancel the DataLINE installation. Click “Yes” to exit the installation. Click “No” to resume the setup process and return to the initial Welcome screen.

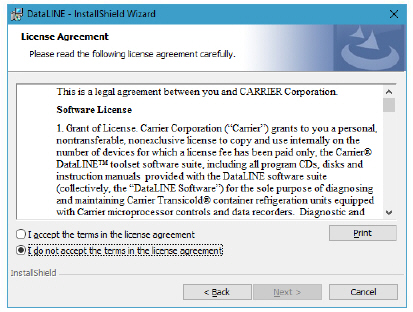
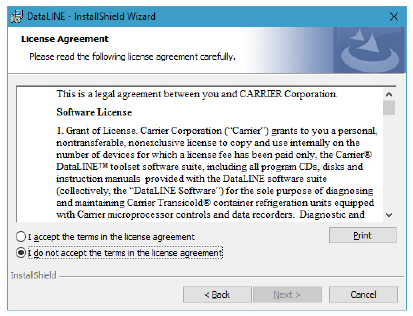
4.On the License Agreement screen, the default option selected is “I do not accept the terms in License agreement”. Change the selection to “I accept the terms in the license agreement”.
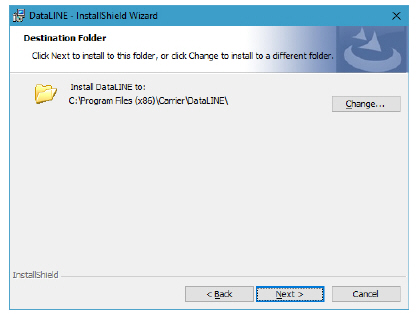
5.Click “Next” to display the Destination Folder screen.
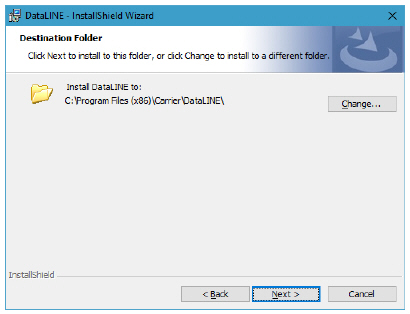
6.At the Destination Folder screen, specify into which directory the system should store the application. The default directory is C:\Program Files (x86)\Carrier\DataLINE\. Click the “Change” button to choose an alternate directory.
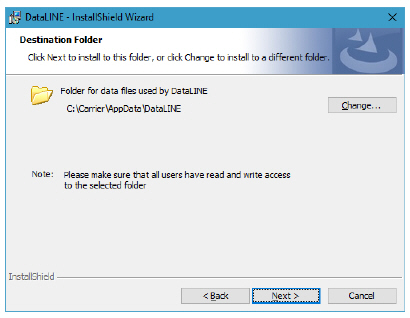
7.Click “Next” to display the Destination Folder screen to select the folder for data files.
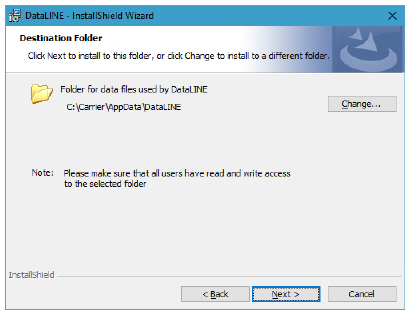
8.At the Destination Folder screen, specify the directory for storing Downloaded data from the system. The default directory is C:\Carrier\AppData\DataLINE. Click the “Change” button to choose an alternate directory.
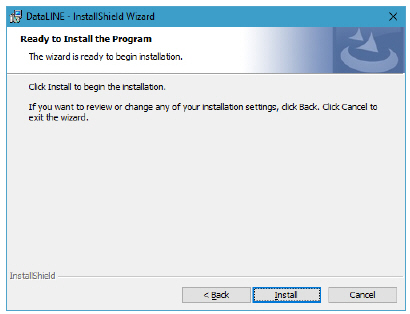
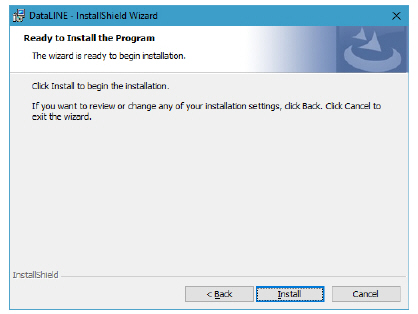
9.Click “Next” to display the Ready To Install screen.
10.Click “Install” to start the application installation. Or, click “Cancel” to exit the installation.
11.Once the Installation has completed, a screen appears stating that DataLINE was installed successfully.
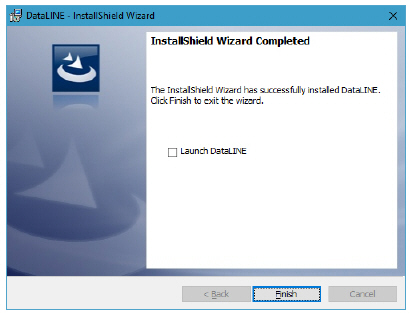
12.Click “Finish” to finish the installation of the application.
2.2.1Service Pack Installation
In order to install the service pack, the target computer must already have DataLINE 2.1 or 2.2 installed.
If DataLINE 2.0 or older is installed, follow the additional instructions for DataLINE 2.2 and then upgrade to DataLINE 2.2 prior to upgrading to DataLINE 3.1.
Procedure for All Users:
1.Download the service pack from the container public website under Products > DataLINE.
2.The method for loading the program is to access the appropriate drive and double click on the “DataLINE_Setup.exe” file.
If the user does not have administrator rights on the machine to install DataLINE, installation cannot proceed further.
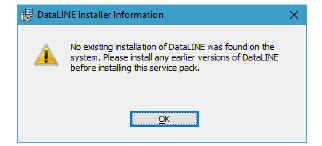
If no existing installation of DataLINE was detected, a screen will be displayed to confirm this. Click “OK” and the installation will abort.
3.The Welcome screen is displayed to begin application setup.
4.Click “Next” to proceed to the License screen.
If the user clicks “Cancel” on the Welcome screen, a screen appears asking to cancel the DataLINE installation. Click “Yes” to cancel the installation or click “No” to resume setup and return to the initial Welcome screen.
5.At the License Agreement screen, the default option selected is “I do not accept the terms in license agreement”. Change the selection to “I accept the terms in the license agreement”.
6.Click “Next” to display the Destination Folder screen.
7.At the Destination Folder screen, specify the directory to store the application. The default directory is C:\Program Files (x86)\Carrier\DataLINE\. Click the “Change” button to choose an alternate directory.
It is recommended that DataLINE 3.1 is installed into its own directory and not into the same directory as a previous version.
8.Click “Next” to display the Destination Folder screen to select the folder for data files.
9.At the Destination Folder screen, specify into which directory the system should store Downloaded data. The default directory is C:\Carrier\AppData\DataLINE. Click the “Change” button to choose an alternate directory.
10.Click “Next” to display the Ready to Install screen.
11.Click “Install” to start the application installation.
12.When installation has completed, a screen appears stating that DataLINE was installed successfully.

13.Click “Finish” to the complete the service pack installation.
14.After installation is complete, follow the procedure in Section 2.2.2 to uninstall earlier versions of DataLINE.
2.2.2Uninstall Earlier Versions of DataLINE
Users must utilize the “Uninstall” utility found in Windows when uninstalling the DataLINE application. Deleting files via Windows Explorer should not be attempted as this can result in system instability.
Procedure for Windows 7 and Windows 8:
1.Click on the “Start” button.
2.Click on “Control Panel”.
3.Under the Programs category, click on “Uninstall a program”.
4.Look for earlier versions of DataLINE program and click on it to select.
5.Click on the “Uninstall” button.
6.The DataLINE uninstall screen will start, which completes the uninstall procedure.
1.Click on the “Start” button.
2.Click on “Settings”.
3.Click on “Systems”.
4.Click on “Apps & features”.
5.Look for earlier versions of DataLINE program and click on it to select.
6.Click on the “Uninstall” button.
7.The DataLINE uninstall screen will start, which completes the uninstall procedure.
Uninstalling earlier versions of DataLINE (2.1 or 2.2) will result in loss of Custom Controller and DataCorder configurations, hence the user needs to recreate those custom configurations in the latest version of DataLINE 3.1.
Uninstalling earlier versions of DataLINE (2.1 or 2.2) will result in loss of online communication, requiring the installation to be repaired. Follow instructions in Section 2.2.3 for procedure.
1.Double click on the “DataLINE_Setup.exe” file to open a Welcome screen.
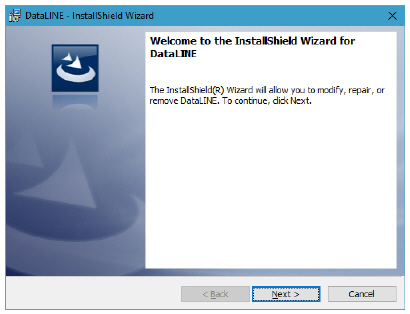
2.Click “Next” to bring up the Program Maintenance screen.
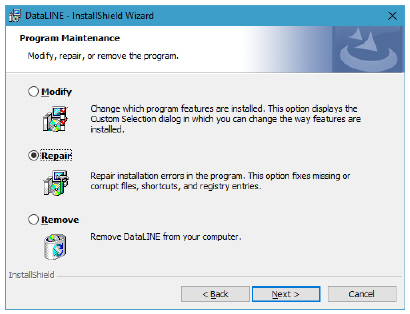
3.On the Program Maintenance screen, the default option selected is “Modify”. Change the selection to “Repair”.
4.Click “Next” to bring up the Ready to Repair screen.
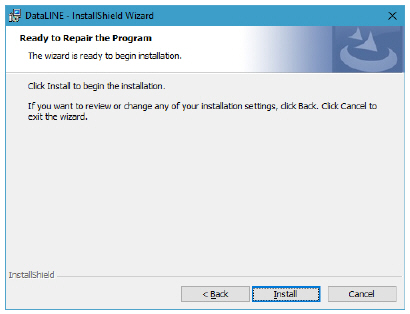
5.Click “Install” to repair the installation. The InstallShield Wizard Completed screen appears.
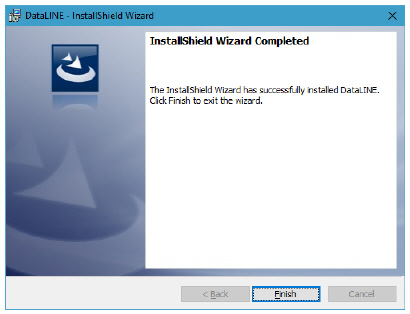
6.Click “Finish” to complete the Installation.
1.Click on the “Windows” button.
2.Navigate to “All Programs”.
3.Click on the “Carrier” folder.
4.Click on “Launch Pad”.
For All Users on Windows 7/8/10
In order to access the complete functionality of DataLINE, users should have administrator access rights on the machine that DataLINE is installed.